Stonelee's Blog

如无必要,勿增实体

Vim最佳插件实践

分享到: 更多

基本都是直接复制到bundle,然后添加doc帮助

1
:helptags ~/.vim/bundle/something/doc

pathogen 将插件按文件夹放置,方便管理

将pathogen放到autoload下

.vimrc:

1
2
3
filetype off
call pathogen#runtime_append_all_bundles()"方便管理plugin
filetype plugin indent on

python增强语法高亮

python增强编辑

会提供一个python菜单,快捷键也相应提供了

minibufexpl多标签切换

.vimrc:

1
2
3
4
5
6
"<C-hjkl>minibuffer中移动
let g:miniBufExplMapWindowNavVim = 1
"<C-TAB> and <C-S-TAB> 直接在当前窗口切换buffer
let g:miniBufExplMapCTabSwitchBufs = 1
"防止与Taglist冲突
let g:miniBufExplModSelTarget = 1

NERDCommenter自动注释

1
<leader>c<space>来切换注释与否

NERDTree树状菜单

.vimrc:

1
2
map <leader>e :NERDTreeToggle<cr>
let NERDTreeIgnore=['.vim$', '\~$', '.*\.pyc$', 'pip-log\.txt$']
1
<leader>e来切换树形菜单显示与否

xptemplate Snippet Template engine

支持嵌套,支持同文件多模板识别

1
<C-\>显示模板,<Tab><S-Tab>切换焦点

自己更改模板: ftplugin下找到对应模板文件,添加新的模板

去掉多余空格: .vimrc:

1
let g:xptemplate_vars = "SParg="

Ack 目录文件中查找字符

安装Ack:

1
sudo apt-get install ack-grep

安装 Ack插件 .vimrc:

1
let g:ackprg="ack-grep -H --nocolor --nogroup --column"

Ack something可以在当前目录查找字符

zencoding扩展html

1
2
3
4
5
6
7
8
<C-y>, 扩展
<C-y>n <C-y>N 到下/上一个输入点

<C-y>d <C-y> D选中
<C-y>j 简写标签,也可扩展

<C-y>i img上使用可以自动添加宽高
<C-y>a 在连接上可以添加a标签

YankRing增强型粘贴

1
2
3
:YRShow显示剪贴板

<C-p> <C-n> 轮番切换剪贴板

translate

1
:Trans翻译光标所在文字

surround增删改标签

1
2
3
4
5
6
7
ds“ 删除两端的”“
dst 删除两端的标签
cs”{ 将两端的“”改为{  } 有空格
cs”} 将两端的“”改为{} 无空格
yss) 两端加上()
ysiw) 将光标所在单词两端加上()
配合repeat实现.重复操作

slime测试代码段

终端中建立一个screen

1
2
3
4
screen -S devshell
python

选中代码,<C-c><C-c>可以在screen中查看运行情况。

screen的使用可以参看: http://hi.baidu.com/ubuntu2me/blog/item/ce61b23798a5a93b0b55a960.html http://wiki.ubuntu.org.cn/GNUScreen http://www.9usb.net/201002/linux-screen-mingling.html

pep8代码静态检查

需要先安装工具 “pep8”:http://github.com/cburroughs/pep8.py F5 安装pep8规则检查代码

jpythonfold代码折叠

需要重命名为python.vim .vimrc中:

1
nnoremap <space> za

空格 折叠、打开代码段 zr 打开所有折叠 zm 所有折叠

js代码折叠

1
let javaScript_fold=1

ctags+ taglist展示代码结构

安装ctags,在要生成tags的目录下ctags -R 安装taglist插件

1
:TlistToggle切换tags显示与否

tasklist显示todo列表

1
<leader>t 打开todo列表

盖房子种树记好时间

分享到: 更多

问题描述

设想以下场景:盖个房子,房子需要m秒才能盖好;然后种了棵树,树需要n秒才能长好。盖房子、种树等行为都是连续的操作,手动即可,不能间断,而时间的存储一般人是需要存到脑子中,或者记到笔记本上,或者定个闹钟。时间到后再进行相应的处理。

解决方案

模拟人的行为:手动操作作为主线程顺序执行,需要存储时间时开启新的一个线程来保存时间并计时(也就是说两者需要做到异步)。仅仅存储时间是不够的,还需要将该时间所对应的状态信息保存下来,以供时间到后的下步操作。

1
2
3
4
5
6
7
8
9
10
11
12
13
14
15
16
17
18
19
20
21
22
23
24
25
26
27
28
29
30
31
32
33
34
35
36
37
38
39
40
41
42
43
44
45
46
47
48
49
50
51
52
53
54
55
56
57
58
59
60
61
62
63
64
65
66
67
68
69
70
#!/usr/bin/env python
# -*- coding: utf-8 -*-
# Last Update:

__revision__ = '0.1'
__author__ = 'lxd'
import threading
import time

class TimeThread(threading.Thread):
    """等待线程
    """
    def __init__(self, name, seconds):
        threading.Thread.__init__(self, name = name)
        self.seconds = seconds

    def run(self):
        time.sleep(self.seconds)

class TimeWorks(object):
    def __init__(self):
        self.wait_works = {}#等待工作列表,包括工作的所有细节
        self.wait_times_threads = []#线程列表

    def setTime(self, name, data, seconds):
        """将data放入等待工作列表中,并将工作放入线程中等待
        name如果已存在,则会覆盖原来的
        """
        self.wait_works.update({name:data})
        atime = TimeThread(name, seconds)
        atime.setDaemon(True)
        atime.start()
        self.wait_times_threads.append(atime)

    def checkTimeThread(self):
        """获得时间已到的工作
        """
        for atime in self.wait_times_threads:
            if not atime.isAlive():
                self.wait_times_threads.remove(atime)
                return self.wait_works.pop(atime.name)

if __name__ == '__main__':
    print 'start'
    timeWorks = TimeWorks()

    build = {'kind':'build', 'name':'build1', 'pos':(1, 2)}
    timeWorks.setTime('build1', build, 5)

    farm = {'kind':'farm', 'name':'tom', 'pos':(3, 5)}
    timeWorks.setTime('farm1', farm, 3)

    def build_something(data):
        print 'build_something', str(data)

    def farm_something(data):
        print 'farm_something', str(data)

    i = 0
    while True:
        print 'do_something', i
        i += 1
        time.sleep(1)

        data = timeWorks.checkTimeThread()
        if data:
            if data['kind'] == 'build':
                build_something(data)
            elif data['kind'] == 'farm':
                farm_something(data)

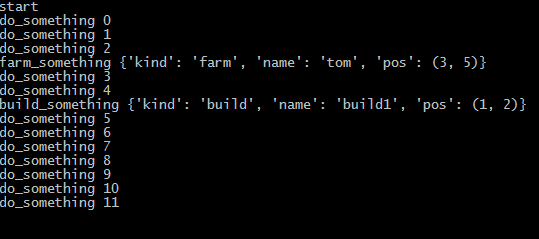
结果如下:

改进了一下代码,去掉了不必要的线程名,这样就不用去考虑命名重复的问题了。另外把线程类简化成一个内部函数:

1
2
3
4
5
6
7
8
9
10
11
12
13
14
15
16
17
18
19
20
21
22
23
24
25
26
27
28
29
30
31
32
33
34
35
36
37
38
39
40
41
42
43
44
45
46
47
48
49
50
51
52
53
54
55
56
57
58
59
60
61
62
63
#!/usr/bin/env python
# -*- coding: utf-8 -*-
# Last Update:

__revision__ = '0.1'
__author__ = 'lxd'
import threading
import time

class TimeWorks(object):
    def __init__(self):
        self.wait_works = {}#等待工作列表,包括工作的所有细节
        self.wait_times_threads = []#线程列表

    def setTime(self, data, seconds):
        """将data放入等待工作列表中,并将工作放入线程中等待
        """
        def sleep(seconds):
            time.sleep(seconds)

        atime = threading.Thread(target = sleep, args = (seconds, ))
        atime.setDaemon(True)
        atime.start()
        self.wait_times_threads.append(atime)

        self.wait_works.update({atime.name:data})

    def checkTimeThread(self):
        """获得时间已到的工作
        """
        for atime in self.wait_times_threads:
            if not atime.isAlive():
                self.wait_times_threads.remove(atime)
                return self.wait_works.pop(atime.name)

if __name__ == '__main__':
    print 'start'
    timeWorks = TimeWorks()

    build = {'kind':'build', 'name':'build1', 'pos':(1, 2)}
    timeWorks.setTime(build, 5)

    farm = {'kind':'farm', 'name':'tom', 'pos':(3, 5)}
    timeWorks.setTime(farm, 3)

    def build_something(data):
        print 'build_something', str(data)

    def farm_something(data):
        print 'farm_something', str(data)

    i = 0
    while True:
        print 'do_something', i
        i += 1
        time.sleep(1)

        data = timeWorks.checkTimeThread()
        if data:
            if data['kind'] == 'build':
                build_something(data)
            elif data['kind'] == 'farm':
                farm_something(data)

算法时间复杂度直观展示

分享到: 更多

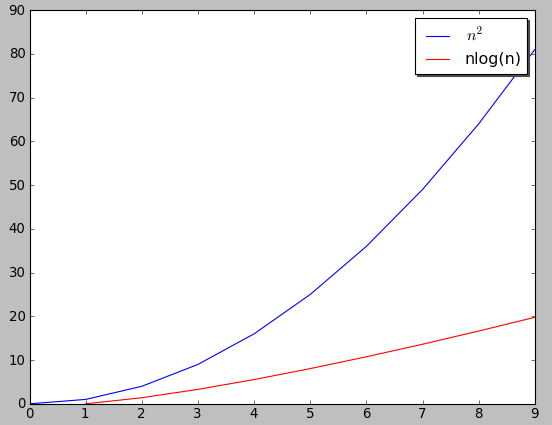
整天看算法复杂度说什么冒泡排序o(N*N),快排o(NlogN),今天有空实际画了下,还真是差别挺大的。

1
2
3
4
5
6
7
8
9
10
11
12
13
14
#!/usr/bin/env python
# -*- coding: utf-8 -*-
import numpy as np
import matplotlib.pyplot as plt

fig = plt.figure()
n = np.arange(0, 10, 1)

s1 = n**2
s2 = n*np.log(n)
plt.plot(n, s1, 'b-', n, s2, 'r-')
plt.legend((r'$n^2$', 'nlog(n)'), shadow = True)

plt.show()

效果:

python嵌入IE浏览器

分享到: 更多

今天在研究visual studio 2008中的WebBroswer时忽然想到,对于我的简单需求(只想在程序中嵌入一个浏览器,而不是开发一个浏览器程序与Chrome、Firefox竞争)来说,只需要简单的调用IE就可以了(我的程序只是针对windows用户),这样的另一个好处是如果用户用IE曾经载入过的文件(如Flash游戏),用我的嵌入式浏览器就不用再次载入的。比以前的思路更符合我的需求,因此我决定顺着这个思路找找看,结果发现人家wxpython早就有了web.lib.iewin,骑驴找驴的事情再次发生~

关键代码:

1
self.ie = wx.lib.iewin.IEHtmlWindow(self)

打开网页:

1
self.ie.LoadUrl(url)

如此简单~

为tortoisehg出把力

分享到: 更多

https://bitbucket.org/tortoisehg/stable/issue/936/importerror-memoryloadlibrary-failed-loading#comment-280484

开源项目:tortoisehg

bug内容:

1
2
3
4
5
6
7
8
9
#936 ImportError: MemoryLoadLibrary failed loading win32api.pyd
Reported by Dmitry Zanozin / dmitryzan, created 10 months ago.
I've received error message on startup of my WinXP after reboot just after install of the latest nightly build tortoisehg-unstable-0.9.35067-hg-1.4.3+67-07bd7608a0ea.exe
There was a suggestion to examine thgtaskbar.exe.log file:
thgtaskbar.exe.log
Traceback (most recent call last):
File "thgtaskbar.py", line 13, in <module>
File "zipextimporter.pyo", line 98, in load_module
ImportError: MemoryLoadLibrary failed loading win32api.pyd

偶的解决方案:

1
2
3
4
5
istonelee
written about a month ago
when I use py2exe to create my project,I receive the same error.I analyse the depends of this dll,and found that py2exe makes some mistakes that include mswsock.dll and powrprof.dll into the library. and my solution is modify the setup.py
'dll_excludes': [ "mswsock.dll", "powrprof.dll" ]
hope my experience could be any useful :)

被作者采纳了:

1
2
3
4
Steve Borho / sborho
written about a month ago
That is interesting that it causes the same error for you. I've added those two and several more DLLs to the dll_excludes list in the setup.cfg file. setup.cfg hasn't changed in 9 months, since 1.0 was released.
http://bitbucket.org/tortoisehg/thg-winbuild/src/tip/misc/setup.cfg

So Happy~

基于wxwebkit实现简单的浏览器

分享到: 更多

如何在python应用程序中嵌入浏览器?google半天之后发现 wxWebKit 是一个相对给力的webkit封装,虽然也有相当多的不足之处,但是对于简单的html渲染是没用问题的,直接给出代码。

1
2
3
4
5
6
7
8
9
10
11
12
13
14
15
16
17
18
19
20
21
22
23
24
25
26
27
28
29
30
31
32
33
34
35
36
37
38
39
40
#!/usr/bin/env python
# -*- coding: utf-8 -*-

__revision__ = '0.1'
__author__ = 'lxd'

import wx
import wx.webview

class MainFrame(wx.Frame):
    def __init__(self):
        wx.Frame.__init__(self, None, -1, 'name', size=(800, 600))
        self.url = wx.TextCtrl(self, -1)
        self.html = wx.webview.WebView(self, -1)
        self.btnLoad = wx.Button(self, -1, u'进入')
        self.Bind(wx.EVT_BUTTON, self.OnLoadClick, self.btnLoad)
        self.layout()

    def layout(self):
        self.Center()

        setupBox = wx.StaticBox(self, -1, u'基本设置')
        setupSizer = wx.StaticBoxSizer(setupBox, wx.VERTICAL)
        setupSizer.Add(self.url, 0, wx.EXPAND|wx.ALL, 5)
        setupSizer.Add(self.btnLoad, 0, wx.ALL, 5)

        mainSizer = wx.BoxSizer(wx.VERTICAL)
        mainSizer.Add(setupSizer, 0, wx.EXPAND|wx.ALL, 5)
        mainSizer.Add(self.html, 1, wx.EXPAND|wx.ALL, 5)

        self.SetSizer(mainSizer)

    def OnLoadClick(self, evt):
        self.html.LoadURL(self.url.GetValue())

if __name__ == '__main__':
    app = wx.PySimpleApp()
    main = MainFrame()
    main.Show()
    app.MainLoop()

输入www.baidu.com没有问题,如果登录的话就杯具了…还有很多工作要做…貌似没有flash,没有cookie…希望有人能在这个基础上继续完善。

Windows使用vim插件cscope查询python项目

分享到: 更多

cscope可以方便的查找函数在哪里被调用,或者标签在哪些地方出现过,vim可以对其进行很好的集成。

  1. 首先确保vim支持cscope,否则需要重新编译一下。
  2. 下载cscope的windows版本,将其解压缩,然后设置到环境变量里。
  3. 下载vim插件 cscope_maps ,放到plugin里。
  4. 生成索引数据库文件。默认情况下cscope只认识c文件,为了保证我可爱的python使用,需要自己生成files文件来告诉cscope。windows下没有好用的find命令,所以自己写个,代码如下:
1
2
3
4
5
6
7
8
9
10
11
12
13
14
15
16
17
18
19
'''生成cscope.files并生成out文件
'''
__revision__ = '0.1'
__author__ = 'lxd'

PATH= r'C:\Users\lxd\Desktop\register'
FILE_TYPE_LIST= ['py']

if __name__ == '__main__':
    import os
    f = open('cscope.files','w')
    for root,dirs,files in os.walk(PATH):
        for file in files:
            for file_type in FILE_TYPE_LIST:
                if file.split('.')[-1] == file_type:
                    f.write('%s\n' %os.path.join(root,file))
    f.close()
    cmd = 'cscope -bk'
    os.system(cmd)

使用时需要将这个文件放到项目目录下,然后更改PATH路径,程序会自动生成cscope.files文件和cscope.out文件,其中cscope.out就是要使用的索引了。

5.打开vim,

1
:cscope add cscope.out

数据库就成功添加了。

@现在在函数名上ctrl+\ 然后s@
函数调用都出来了吧…

Windows下python打包完整解决方案

分享到: 更多

最近想把写的python代码打包,以供没用安装python环境的同事使用,需求如下:

  • 无python环境也可执行
  • 文件尽量少,不要太乱
  • 程序体积尽量小
  • 如果需要更新的话重复类库不用更新

采用方案如下:

  1. 使用py2exe自动导入类库
  2. 使用7-ZIP压缩library
  3. upx压缩dll等文件
  4. nsis生成安装文件
  5. 采用md5验证的方式判别不用更新的类库

使用py2exe自动导入类库

建立文件bin_setup.py

1
2
3
4
5
6
7
8
9
10
11
12
13
14
15
16
17
18
19
20
21
22
23
24
25
26
27
28
29
30
31
32
33
34
35
36
37
38
39
40
41
42
43
44
45
46
47
48
49
50
51
52
53
54
55
56
57
58
59
60
61
62
63
64
65
66
67
68
69
70
71
72
73
74
75
76
77
78
79
80
81
82
83
84
85
86
87
88
89
90
91
92
93
#!/usr/bin/env python
# -*- coding: utf-8 -*-

__author__ = 'lxd'

from distutils.core import setup
import py2exe
import sys

# If run without args, build executables, in quiet mode.
if len(sys.argv) == 1:
    sys.argv.append("py2exe")
    sys.argv.append("-q")

INCLUDES = []

MANIFEST_TEMPLATE = """
<?xml version="1.0" encoding="UTF-8" standalone="yes"?>
<assembly xmlns="urn:schemas-microsoft-com:asm.v1" manifestVersion="1.0">
  <assemblyIdentity
    version="5.0.0.0"
    processorArchitecture="x86"
    name="%(prog)s"
    type="win32"
  />
  <description>%(prog)s</description>
  <trustInfo xmlns="urn:schemas-microsoft-com:asm.v3">
    <security>
      <requestedPrivileges>
        <requestedExecutionLevel
            level="asInvoker"
            uiAccess="false">
        </requestedExecutionLevel>
      </requestedPrivileges>
    </security>
  </trustInfo>
  <dependency>
    <dependentAssembly>
      <assemblyIdentity
            type="win32"
            name="Microsoft.VC90.CRT"
            version="9.0.21022.8"
            processorArchitecture="x86"
            publicKeyToken="1fc8b3b9a1e18e3b">
      </assemblyIdentity>
    </dependentAssembly>
  </dependency>
  <dependency>
    <dependentAssembly>
        <assemblyIdentity
            type="win32"
            name="Microsoft.Windows.Common-Controls"
            version="6.0.0.0"
            processorArchitecture="X86"
            publicKeyToken="6595b64144ccf1df"
            language="*"
        />
    </dependentAssembly>
  </dependency>
</assembly>
"""
RT_MANIFEST = 24

options = {"py2exe" :
    {"compressed" : 1,
     "optimize" : 2,
     "bundle_files" : 2,
     "includes" : INCLUDES,
     "excludes" : ["Tkinter",],
     "dll_excludes": [ "MSVCP90.dll", "mswsock.dll", "powrprof.dll"] }}

windows = [{"script": "bin.py",
      "icon_resources": [(1, "bin.ico")],
      "other_resources" : [(RT_MANIFEST, 1,
                        MANIFEST_TEMPLATE % dict(prog="MyAppName"))],
      }]

setup(name = "MyApp",
      version = "1.0",
      description = "Description of the app",
      author = "Author Name",
      author_email ="author@project.com",
      maintainer = "Maintainer Name",
      maintainer_email = "you@project.com",
      license = "wxWindows Licence",
      url = "http://projecthomepage.com",

      data_files = ["MSVCR90.dll", "gdiplus.dll"],
      #data_files=[("img",[r"d:\test\1.gif",r"d:\test\2.gif"]),("xml",[r"d:\test\1.xml",r"d:\test\2.xml"])])
      #zipfile=None,
      options = options,
      windows = windows,
      )

使用7-ZIP压缩library,使用upx压缩dll等文件

建立脚本bin.cmd

1
2
3
4
5
6
7
8
9
10
11
12
13
14
15
16
17
18
19
20
21
22
23
24
25
26
27
28
29
30
31
32
33
34
35
36
37
38
39
40
41
42
43
44
45
46
47
48
49
50
51
52
53
54
55
56
57
58
59
60
61
62
@echo off

::Set personal Path to the Apps:
set PythonEXE=D:\Python26\python.exe
set SevenZipEXE="D:\Program Files\7-ZIP\7z.exe"
set UpxEXE="D:\Program Files\upx\upx.exe"

:: Compress=1 - Use CompressFiles
:: Compress=0 - Don't CompressFiles
set Compress=1

if not exist %~dpn0.py          call :FileNotFound %~dpn0.py
if not exist %PythonEXE%        call :FileNotFound %PythonEXE%
if not exist %SevenZipEXE%      call :FileNotFound %SevenZipEXE%
if not exist %UpxEXE%           call :FileNotFound %UpxEXE%

::Compile the Python-Script
%PythonEXE% "%~dpn0_setup.py" py2exe
if not "%errorlevel%"=="0" (
        echo Py2EXE Error!
        pause
        goto:eof
)

:: Copy the Py2EXE Results to the SubDirectory and Clean Py2EXE-Results
rd build /s /q
xcopy dist\*.* "%~dpn0_EXE\" /d /y
:: I use xcopy dist\*.* "%~dpn0_EXE\" /s /d /y
:: This is necessary when you have subdirectories - like when you use Tkinter
rd dist /s /q

if "%Compress%"=="1" call:CompressFiles
echo.
echo.
echo Done: "%~dpn0_EXE\"
echo.
pause
goto:eof

:CompressFiles
        %SevenZipEXE% -aoa x "%~dpn0_EXE\library.zip" -o"%~dpn0_EXE\library\"
        del "%~dpn0_EXE\library.zip"

        cd %~dpn0_EXE\library\
        %SevenZipEXE% a -tzip -mx9 "..\library.zip" -r
        cd..
        rd "%~dpn0_EXE\library" /s /q

        cd %~dpn0_EXE\
        %UpxEXE% --best *.*
goto:eof

:FileNotFound
        echo.
        echo Error, File not found:
        echo [%1]
        echo.
        echo Check Path in %~nx0???
        echo.
        pause
        exit
goto:eof

使用方法

直接运行bin.cmd,程序会自动调用bin_setup.py来查找需要的类库,然后对类库文件进行压缩,生成的可执行文件在bin_EXE里。

问题

我在打包的时候,出现错误“ImportError: MemoryLoadLibrary failed loading win32api.pyd”,用depends.exe查看其引用,然后多方搜索得知,其原因是py2exe错误的加载了mswsock.dll,powrprof.dll这两个文件,因此将它们排除即可。

1
"dll_excludes": [ "MSVCP90.dll", "mswsock.dll", "powrprof.dll"] }}

nsis生成安装文件

待续。。。

Python闭包实现的所谓bug

分享到: 更多

思路来自 http://groups.google.com/group/python-cn/browse_thread/thread/895f25d6303de2ec?hl=zh-CN# 整理记录下来,让墙内的人也看看。

问题描述

1
2
3
4
5
6
7
fs = []
for i in range(10):
    def f(n):
        return i + n
    fs.append(f)
print [f(4) for f in fs]
print [id(f(4)) for f in fs]

结果为:

1
2
3
[13, 13, 13, 13, 13, 13, 13, 13, 13, 13]
[145743064, 145743064, 145743064, 145743064, 145743064, 145743064, 145743064, 14
5743064, 145743064, 145743064]

很奇怪的结果吧。 问题所在:

1
2
3
4
5
6
7
8
9
fs = []
for i in range(10):
    def f(n):
        print locals()
        print 'i' in globals()
        return i + n
    fs.append(f)
print [f(4) for f in fs]
print [id(f(4)) for f in fs]

结果为

1
2
locals: {'n': 4}
i in globals is: True

可以看到i根本就没有封闭在f()里,而是个全局变量,因此出现上面的结果也就不奇怪了。 解决方案:

1
2
3
4
5
6
7
fs = []
for i in range(10):
    def f(n,i = i):
        return i + n
    fs.append(f)
print [f(4) for f in fs]
print [id(f(4)) for f in fs]

将全局变量i引入f中,这下结果正确了。

1
2
3
[4, 5, 6, 7, 8, 9, 10, 11, 12, 13]
[143334724, 143334712, 143334700, 143334688, 143334676, 143334664, 143334652, 14
3334640, 143334628, 143334616]

在ubuntu 10.0.4上编译vim7.3

分享到: 更多

编译前准备

如果要编译GVIM,需要先安装必要的库,否则可能会报各种编译错误

1
sudo apt-get install libncurses5-dev libgnome2-dev libgnomeui-dev libgtk2.0-dev libatk1.0-dev libbonoboui2-dev libcairo2-dev libx11-dev libxpm-dev libxt-dev

要添加python支持, 另外还需要python2.6-dev

开始编译

1
2
3
4
5
$ cd src
$ make distclean  #防止缓存
$ ./configure --with-features=huge --enable-gui=gnome2 --enable-cscope  --enable-fontset --enable-multibyte --enable-pythoninterp --with-python-config-dir=/usr/lib/python2.6/config
$ make
$ sudo make install

查看特性添加与否

1
:version